Quick Start in accessing DB2 data from Node.js applications
We are seeing a trend of DB2 data being accessed by modern distributed applications written in new APIs and frameworks. JavaScript has become extremely popular for Web application development. JavaScript adoption was revolutionized by Node.js which makes it possible to run JavaScript on the server-side. There is an increasing interest amongst developers to write analytics applications in Node.js that need to access DB2 data (both z/OS and distributed). Modern DB2 provides a Node.js driver that makes Node.js connectivity straight forward. Below are step-by-step instructions for a basic end-to-end Node.js application on Windows for accessing data from DB2 for z/OS and DB2 distributed -
Enjoy your Node.js test drive with DB2!
We are seeing a trend of DB2 data being accessed by modern distributed applications written in new APIs and frameworks. JavaScript has become extremely popular for Web application development. JavaScript adoption was revolutionized by Node.js which makes it possible to run JavaScript on the server-side. There is an increasing interest amongst developers to write analytics applications in Node.js that need to access DB2 data (both z/OS and distributed). Modern DB2 provides a Node.js driver that makes Node.js connectivity straight forward. Below are step-by-step instructions for a basic end-to-end Node.js application on Windows for accessing data from DB2 for z/OS and DB2 distributed -
1) Install
Node and its companion NPM. NPM is a tool to manage Node modules.
Download the installer from
https://nodejs.org/dist/v0.12.7/x64/node-v0.12.7-x64.msi.
2) Note that DB2 Node.js driver does not support Node 4 on Windows yet.
Node 4 support is already available for Mac and Linux. We will have
Node 4 support for Windows out very soon.
3) Install a 64-bit version of Node since DB2 Node.js driver does not
support 32-bit.
4) Run
the installer (in my case node-v0.12.7-x64.msi).
You should see a screen like Screenshot 1.
 |
| Screenshot 1 |
5) Follow the instructions on license and folder choice until you reach
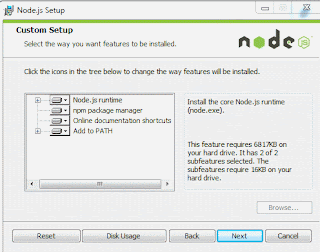
the screen for the features you want installed. Default selection is
recommended and click Next to start intsall (Screenshot 2).
 |
| Screenshot 2 |
6) Verify
that the installation is complete by opening the command prompt and
executing node
-v
and npm
-v
as shown in Screenshot 3.
 |
| Screenshot 3 |
7) You
can write a simple JavaScript program to test the installation.
Create a file called Confirmation.js
with contents console.log('You
have successfully installed Node and NPM.');
8) Navigate
to the folder you have created the file in and run the application
using node
Confirmation.js.
Output looks like Screenshot 4.
 |
| Screenshot 4 |
9) Now
install the DB2 Node.js driver using the following command from
Windows command line: npm
install ibm_db
(For NodeJS 4+, installation command would be different as follows
npm
install git+https://git@github.com/ibmdb/node-ibm_db.git#v4_support).
10) Under the covers, the npm command downloads node-ibm_db package from
github and includes the DB2 ODBC CLI driver to provide connectivity
to the DB2 backend. You should see following output (Screenshot 5).
 |
| Screenshot 5 |
11) Copy
the following simple DB2 access program in a file called DB2Test.js
and
change the database credentials to yours -
var ibmdb =
require('ibm_db');
ibmdb.open("DRIVER={DB2};DATABASE=<dbname>;HOSTNAME=<myhost>;UID=db2user;PWD=password;PORT=<dbport>;PROTOCOL=TCPIP",
function (err,conn) {
if (err)
return console.log(err);
conn.query('select
1 from sysibm.sysdummy1', function (err, data) {
if (err)
console.log(err);
else
console.log(data);
conn.close(function
() {
console.log('done');
});
});
});
12) Run
the following command from Windows command line to execute the
program: node
DB2Test.js.
You should see Screenshot 6, containing the output of SQL SELECT
1 from SYSIBM.SYSDUMMY1.
Your simple Node application can now access DB2.
 |
| Screenshot 6 |
13) For connecting to DB2 for z/OS, modify the Connection URL, DB name,
port, user name and password to DB2 for z/OS credentials.
14) DB2
for z/OS access needs DB2 Connect license entitlement. In most
production DB2 for z/OS systems with DB2 Connect Unlimited Edition
licensing, server side license activation would have already been
done, in which case you don't need to do anything about licensing. If
you get any license error on executing the program, server side
activation may not have been done. In that case, copy the DB2 Connect
ODBC client side license file into ibm_db/installer/clidriver/license
folder.
15) Also make sure that the DB2 for z/OS server you are testing against
has CLI packages already bound (this would have been already done as
part of DB2 Connect setup on the DB2 z/OS server).
16) Run the program with DB2 for z/OS credentials and you will observe
similar output as Step 12.
Enjoy your Node.js test drive with DB2!
this blog providing good information To learn NodeJS visit http://iwebworld.info contact: iwebworldinfo@gmail.com
ReplyDeleteAfter reading this blog I am very strong in this topics and this blog is really helpful to all... Explanation are very clear so it is easy to understand.. Thanks for sharing this blog...
ReplyDeletenode js developer london